Showing posts with label toys. Show all posts

Wednesday, April 27, 2011

Today I'd like you to meet.....

the Bunny Family. I've got my inspiration from here. I've had them on my to make list for a long time and finally decided to make them for my daughter for Easter. I couldn't find the pattern anywhere so I decided to make up my own. The house pattern I got from here and was going to make the things for inside but decided it could be the Bunnies house instead. 
 
I wonder if anyone is home.

 Oh look! It's Daddy bunny. 

 and hey it looks like everyone else is home too! 
 Meet the Bunny Family. 
 Daddy Bunny

 Mommy Bunny
Sister Bunny
Brother Bunny
 and Baby Bunny

I really like how they turned out. After making them I would do a few things differently next time. Maybe sew them right sides together and stuff them that way. I found a pattern online for a gingerbread boy and used that and cut it down each time. For Baby Bunny I drew my own and wished it was more uniform with the others. But other than that I am quite pleased with how they turned out. What do you think?

Saturday, January 15, 2011

A girly I Spy Bag

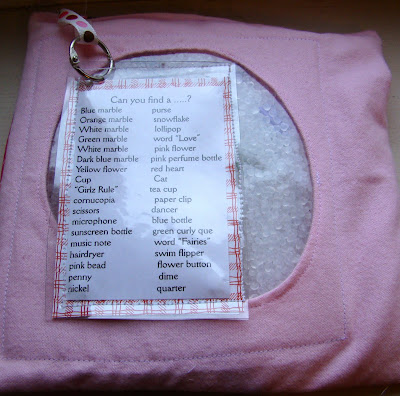
For Christmas I made this I spy bag for my nieces. For the objects inside I used old buttons and little knick knacks from my stash.

I also made a little card that has everything in the bag. I wanted to laminate it but instead I just used that clear plastic stuff and sewed the card inside.
I attached a metal ring to a piece of ribbon and punched a hole in the card so it can be removed for younger children that can't read. They love just looking at the items too.
I've been saving this heart fabric for something. This was just perfect!
Here is a list of all the items I put in the bag. I wanted to have lots of items in there and I wanted it to be challenging as well. It was a huge hit! My nieces LOVE it!
I also made one for my daughter but need to finish filling it. I'll post pictures of it when I finish.
If you want to make a I spy bag too a great place to look for items to stuff your bag is on ebay. I bought a random assortment of buttons and things a while back and used a lot of those for the bag.

Wednesday, December 22, 2010

Car Mat

I hope you all don't mind that I'm featuring others projects for a while. But I'm taking a much deserved break for the holiday and am enjoying spending time with the newest member of our family. :)
I know you've all seen those play car mats floating around. When I saw this one that Larissa made I fell in love!
Didn't she do such a great job? I love the buttons for apples and the car wash. This would be a great gift for any boy. You might not have time to make one before Christmas but I think it's great to showcase others work. Great job Larissa!

Wednesday, December 15, 2010

Tips for Organizing Toys

My daughter has lots of toys. A few months ago I wanted to do a different method for organizing all of them. My mom got us some cubbies with fabric baskets from Target. The great thing about these baskets is they are really tall and deep. So you can shove tons of toys inside.

We also took some pictures of what was in the baskets and printed them at Wal-Mart. I just put some velcro on the bin and the picture to attach it to the bin. This way my daughter sees the picture knows what's inside. Which is great because she can pull out what she wants and then knows which bin to put it in when she's done playing.

Another great tip I wanted to share was these tube thingy's. You can find them in the screw isle at Home Depot. I decided to use them for some of the smaller toys my daughter has. Like pom pom's and bugs.
Or for her crayons and colored pencils.
The great thing is they have different sizes. Which is perfect for crayons, animals or anything else you can think of. Now when my daughter wants to color I know where the crayons are. Super easy and a fun way to store toys. What's one of your favorite ways to store your kids toys?

Thursday, November 25, 2010

Another Travel Felt Mat

Remember a few days ago when I made a Travel Felt Mat for my daughter's friend? I just had to make one for my daughter as well.

I've had this umbrella fabric sitting for months waiting for the right project. I am so glad I was finally able to find a project to use it.

When I asked my daughter what she wanted for her book she told me, "Fishies" so fish it was.
I also cut out a apple tree and some apples.

I just love how well this fabric worked out for this project.
Don't those umbrella's just make you happy?

Happy Thanksgiving!

Wednesday, November 24, 2010

Colors Quiet Book

As you all know I LOVE making quiet books. There is just something about the little pieces and the different kinds you can make that is addicting. When I was little I had a farm quiet book and I LOVED it! I would put the felt animals on people's sweaters at church and on the bench in front of us. Maybe that's when this love for quiet books started.
I made this Colors Quiet book for my daughter last year. My very first one! Since then I have made two others and I think my sewing skills have improved quite a bit but I just thought it would be fun to share it with you.

Colors Quiet Book
For the cover I went through my scraps and tried to pick out each color I used in the book. I really love the different colors and patterns.
For the pages I just used white felt and then used heavy interfacing and sew the pages together.
I wanted to use items that my daughter liked at the time. I also hand stitched all the colors and then sewed them onto a piece of fabric that matched the color.
The fish bowl is my favorite page. Later I decided to add a back to the fish to help with durability. You can also take the fish in and out of the bowl.
My daughter LOVES ducks so I knew that for yellow there would be ducks.
Green Frog
Blue bird
It seems that every quiet book for purple they do grapes. I hand stitched the grapes on at first and learned later how bad an idea that was. I plan on making some new grapes with velcro.
For Brown all I could come up with was Chocolate Ice Cream with a cherry on top.
Pink Flower
For the back cover I hand stitched a little message to my daughter.
I had a hard time figuring out how to bind this book. I didn't know about grommets at the time so I just punched holes in the pages and used metal rings to hold the book together.
I then took some of my leftover scraps and tied them in knots on the rings. For this being my first ever quiet book I think it turned out great don't you? There are a few pages that I need to fix but that's how we learn right?

Friday, November 19, 2010

Travel Felt Mat

Next week is my daughter's friends birthday. I wanted to make something for her but wasn't quite sure what to make. I thought about finger puppets but those take time and I needed to give the gift to her today.
Yesterday while looking online I found this amazing tutorial for a Travel Felt Mat. It was perfect! I already had all of the supplies so I decided to make one for my friends daughter.


Since our friends are going to be traveling for Thanksgiving I thought this would be a great gift to keep their daughter entertained. Plus I loved how compact it was. Instead of doing a velcro closure I decided to use a button instead.
When you open it up there is a felt board with pockets to the sides.
I decided to make a tree and lake with ducks. I had a hard time cutting out the ducks. They look a little funny but I don't think a 2 year old will mind. Do you?
In the other pocket I cut out a bunch of different shapes. I thought it would be a great way for her to name the shape and tell what color it was.
Then when your all done playing you can store the pieces away in the little pockets on the sides.
I couldn't find any wrapping paper so I just used some yellow tissue paper and wrote a message on top.
Then I used some pipe cleaners and made some curly-q's on top and Viola! A simple and easy birthday gift. These would also be great stocking stuffers or gifts.

I also made another one for my daughter but I still need to make some felt stories for hers. I'll post pictures of it when I'm done. I also thought you could do Old MacDonald, Twinkle Twinkle Little Star, A princess and her castle, 5 little monkey's jumping on the bed, Noah's Ark or The Itsy Bitsy Spider. The possibilities are endless with this.
If you'd like to make one too head on over to Our Journey and check out the tutorial.


LinkWithin

Related Posts with Thumbnails