Showing posts with label thrifty. Show all posts

Wednesday, February 29, 2012

My first ever T-Shirt

I've been trying to overcome my fear of knits. I've sewed a few pants for my son and finally decided to tackle a shirt. It took lots of thinking and trial and error but I am pretty pleased with myself. 

The Hounds-tooth Shirt
I used a old shirt I found at D.I. and just traced one she already had that fit her well for the pattern.
 I know this picture is a bit blurry but I wanted to share it because I'm not sure why that neck looks so wonky. Any ideas? I used rib knitting around the neck for the first time ever! Do you need to stretch it and then pin? Or maybe it was how I traced out the pattern? Any suggestions would be much appreciated. :)

Overall I really like it. I learned a lot and am just glad my first attempt is wearable. :) Here's to hoping shirt number two is even better than the first. 

Saturday, January 14, 2012

Thrifty Saturday Finds

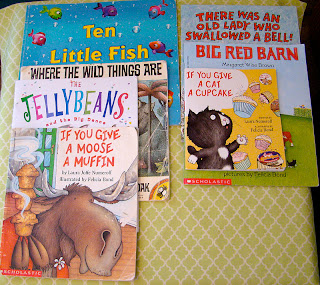
I thought it would be fun to share some of my thrift store finds on Saturdays. Here is what I found today.

 I love finding children's books at the thrift store. All of these are in almost perfect condition. I got all 7 books for $5.25  :)

I've had the heart straw wreath for a while now which I got for one dollar. :) I also snatched up the red and pink sweater today for 3 bucks each. I have a project for these three objects that I hope to share with you soon. 
Total: $11.25
What are some great finds you've found lately?

Tuesday, November 22, 2011

Book Page Decor Tutorial

Every time I got to my Sister in laws I always notice these cute book page decorations. Last time I as over I finally asked her how to make them. 

Just in case you want to make some too I made a quick tutorial. 

Book Page Tutorial

Supplies: A paperback book ( I just used one I had lying around the house no one reads)
Scissors
Glue Gun


Now, let's get started! Use your scissors and cut off the books covers.


Then you take a few pages in your hand....
 and fold them over. Repeat.
 The pages will get really poufy. Just smash them a bit with your fingers. 
Like so.

Keep folding and squashing until you've finished with all of the pages. It will look like this when you are finished.

Just use a bit of hot glue along one the end pages and glue them together. Then do some more smashing, moving, and fixing until you get it how you would like. 


Voila! You are done. Super easy and really quite cute. You could also tie some festive ribbon around them. I just didn't have any on hand. 
 Now go and find a book and get started. You'll be glad you did. :)

Saturday, September 10, 2011

Decorating a nursery on a budget

 So...my son is almost 9 months old and I just finished decorating his nursery. I feel more settled in our new place and finally decided to tackle his room. I really tried to decorate on a budget so most of the things in his room I found at D.I or yard sales.
Here's the view from the door.
Before we moved I found this rocking chair at D.I for $8. As I was checking to see how sturdy it was a gentleman that worked there said, "I'll give it to you for $4." Really? I was going to pay the 8 bucks but $4?!? Awesome! I've thought about painting it. But I kind of like how it is. Don't you? The crotcheted blanket was a gift.
 I wanted a place to display some decorations. I found this shelf at a yard sale for $1. The little elephant pull toy was about a dollar from D.I. I used that to to base color scheme and decorations. Then his little white shoes he wore on his blessing day and some awesome vintage letterpress letters spelling out his name. Those were also a D.I. find. :)
 I found this great tutorial to make this circle mobile. I love the different fabrics and colors. It was so much fun to make. 

 I found this canvas for $4 at D.I. I wish I took a before picture. It was horrid! I just had to paint it. Then I used my silhouette and cut out these elephants. I love the light blue on top of the gray.
 I really needed a little nightstand for his lamp which I also found at D.I. I then spray painted it gray. I'm thinking of putting some new fabric over the lamp shade. Yay or nay?
 I saw via pinterest that you can use IKEA spice racks as bookshelves. I didn't like the unfinished wood so I painted it white. I also found that cute book "Clean clothes for Oliver" such a cute book and perfect for my little Oliver. :)
 I also snatched up this curly O at Hobby Lobby and modge podged on some cute scrapbook paper.
I really enjoyed decorating his nursery and I hope you got some great ideas. I loved taking old things and giving them new life. Now, every time I walk into his room I just can't help but smile. 

Tuesday, September 7, 2010

Missing Earrings- Not any more!

I LOVE jewelry! I always have. But lately I've been loosing some of my earrings. I didn't have a certain place for them and would just lay them anywhere. Until I saw this Tutorial over at H is for Handmade. A simple and cheap way to store all of your earrings.

Here is my version of the Lace Earring Holder

I found this ugly brown picture frame at D.I. for $1 and spray painted it blue.
I'd bought a bunch of lace from D.I. about a year ago. Not really sure what to do with it. Until now!
Here it is. Hung right above my dresser and jewelry box.

Now I don't have any problems finding a pair of earrings to wear. They are all right there. After making it though I can tell that I need some new earrings for myself.
Thanks Amy for the great tutorial! Head on over to her blog and check it out. You won't be disappointed.

LinkWithin

Related Posts with Thumbnails