Showing posts with label home decor. Show all posts

Wednesday, April 18, 2012

Simple Spring Mantel

My mantel needed some updating since Easter is now over. I decided to go really simple and have lots of color. I really Love it!


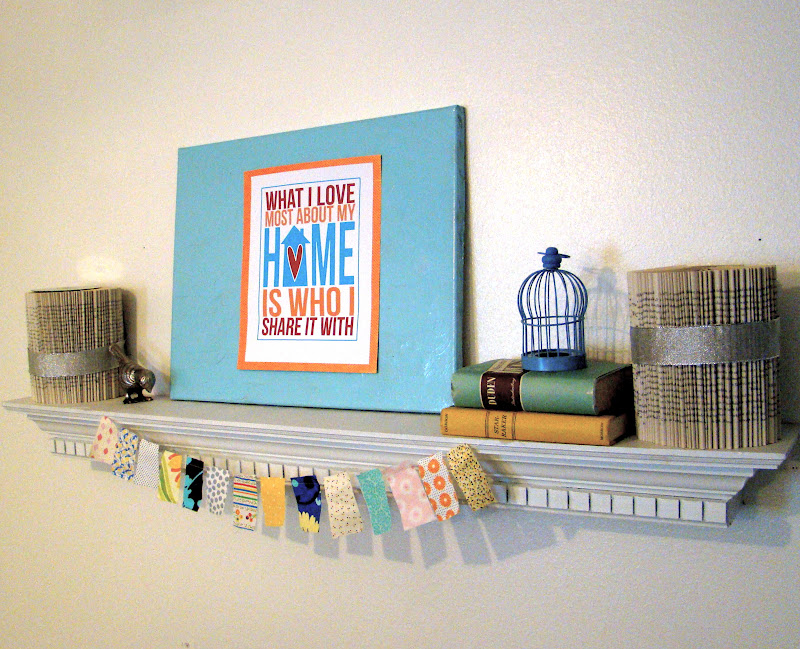
My new obsession is banners. :) I went through some of my fabric scraps and picked out some favorites. Then I cut them all the same size and sewed them together. Super easy! A great way to add color and patterns.

I also used some of my husbands vintage books. The Star Raker and Duden. :) I added a blue birdhouse I found while thrifting. 
This canvas has been sitting empty since Valentines. My Mom printed off the Home sign for me. I decided to just tape it on top of the canvas. I love how the blue ties in with the canvas. 


I kept my book decor up as well. I also put up my metal bird I got a few years ago. 
Theres my fun, colorful and super simple mantle. It makes me smile :)

Just another quick announcement. Have you heard of the Snap Conference going on this weekend? They are also having a Queen Bee Market at Thanksgiving Point in Utah. My husband is one of the vendors. :) There are some amazing vendors and the best part is it's FREE to the public. If your in Utah make sure to stop by and say "Hi." Here's the link to all the vendors that will be there and here's a link to my husbands shop, Sweet Old Stuff


Tuesday, January 17, 2012

DIY Heart Wreath

I am also going to have a new segment on the blog. Tutorial Tuesdays- where I share something I have made during the week.

Remember this picture that I showed you on Saturday? I turned two old sweaters and a straw wreath into.....

This beautiful wreath!


 Here's how I did it. I cut up the sweaters along the seams in the bodice and the arms. Leaving me with two bodice pieces and two arm pieces. 


Then I started cutting circles, and cutting, and cutting. Until I had used up every bit of fabric.


Next I just folded the circle in half, then in half again and put a pin at the end and stuck it in the wreath. I wanted to have a striped effect in the pink and red but you could do any pattern.

After folding and pinning and more folding and pinning I finally finished. Phew! 

I absolutely LOVE how this turned out. It was really simple to make just time consuming. In total this project cost me about $10. I love having it up on my mantle where I can admire it during the day. 

Tuesday, November 22, 2011

Book Page Decor Tutorial

Every time I got to my Sister in laws I always notice these cute book page decorations. Last time I as over I finally asked her how to make them. 

Just in case you want to make some too I made a quick tutorial. 

Book Page Tutorial

Supplies: A paperback book ( I just used one I had lying around the house no one reads)
Scissors
Glue Gun


Now, let's get started! Use your scissors and cut off the books covers.


Then you take a few pages in your hand....
 and fold them over. Repeat.
 The pages will get really poufy. Just smash them a bit with your fingers. 
Like so.

Keep folding and squashing until you've finished with all of the pages. It will look like this when you are finished.

Just use a bit of hot glue along one the end pages and glue them together. Then do some more smashing, moving, and fixing until you get it how you would like. 


Voila! You are done. Super easy and really quite cute. You could also tie some festive ribbon around them. I just didn't have any on hand. 
 Now go and find a book and get started. You'll be glad you did. :)

Friday, September 30, 2011

DIY- Gallery Wall

I've seen Gallery Walls everywhere and really wanted to have one for our house. I just used thrifted frames in a variety of shapes and sizes and spray painted them. 
 This frame has to be my favorite. I love the detailing!

I decided on using Rustoleum Spray Paint. The color is Aqua. I love it!
To hang them I just used thumbtacks. I'm not very good at hanging pictures. I usually make way too many holes. :) 
If I find any other fun frames I can just keep adding to it. I was thinking of printing off some family pictures in black and white and putting them in the frames. Someday that will happen. But for now they will just stay empty. 

Friday, July 29, 2011

Chair Re-do

Hello Everyone! So sorry about the long break in blogging. Moving sure throws you off your schedule. I have some fun projects I am working on that I'm super excited to share with you.
Until then I thought I would share our kitchen chairs we re did. These are from before my craft blog in 2007 but I love them so much I thought you all might want to see them too.

I found these great ladder back chairs at a friend's parents garage sale. I loved the architecture and how small they were. I saw lots of potential. After much debating we bought all 4 chairs for $100.


We decided to stain them a dark cherry looking color. This took forever! If I would do it again I would suggest not doing it in your unfinished basement. It stinks up the entire house!
Voila! Isn't she pretty? As you can see it is a beautiful blue warp with a natural white weave, woven in the ever-popular "checker board" pattern. Though many of you may have doubted that I would ever get the seat woven (it did take about 4 months from date of purchase to finished product) here it is and it is even sittable or seatable (if either of those are words consider yourself lucky.)

Monday, April 25, 2011

Spring Flower Wreath

I decided to spruce up the wreath on my front door. It had some orange thingy on it with berries. It was starting to fade so I gave it a spring flower makeover. :) 

I love how it turned out!
 The best part is that most of these flowers I had already made. They were just laying around waiting for the perfect project.

It makes me smile. Except I decided it was too pretty to be on the front door. So I moved it inside and replaced it with something else. :) I'll share it with you tomorrow.
Here are the links to the different flowers I made, in case you want to make some too. Here, here and here.

Thursday, April 21, 2011

Chevron Love

I've been on a pillow craze! Pillows are a great way to change up decor without paying very much. I know Chevron pillows are everywhere right now and I wanted to give it a try. I used my Silhouette and had it cut out the chevron and the words Love.
It was really easy! I didn't have to cut a thing! Which is great because if you know me well I am horrible at cutting. Maybe it's a lefty thing. :) 
After I ironed the chevrons on I sewed around all the edges with my sewing machine. I love the stitched look.


Here's another pillow I made using freezer paper.
 I just had the Silhouette cut out my stencil and then I painted and sewed it up. Super easy and really fun!

Friday, March 25, 2011

Easter Blocks

While putting up some new Easter decor I came across these Happy Easter blocks that my mother in law gave me last year.

I think she picked them up from a craft fair for me. But these would be super easy to make. Just get varying sizes of blocks, paint them, and then add some vinyl to them and Voila! You have some cute blocks for Easter.

Saturday, January 29, 2011

Envelope pillows

I made these pillow covers for my sister for Christmas. I really like how they turned out. I will definitely be making more envelope pillows in the future.


My sister loves red so I used this red and white fabric for the other cover.

I used this tutorial for making the pillow covers. It was so easy and quick. I love those ladies over at DIY dish. They make every project so simple and fun.

LinkWithin

Related Posts with Thumbnails